Overview
The concept of an 'unpickable' lock is a tantalizing myth, much like a waterproof sponge. But the journey of designing and circumventing such locks is where the real intellectual thrill lies. Recently, Works by Design unveiled a 'traveling key lock' that they touted as unpickable, sending samples to lockpicking enthusiasts like Lock Noob. This guide walks you through the impressioning attack that successfully defeated that lock — a method that took over an hour of meticulous filing but proved that no lock is truly invincible.

We'll explore the lock's inner workings, the step-by-step process of impressioning, and the clever (yet fragile) plastic pin that was meant to thwart this very attack. By the end, you'll understand why unpickable is always a matter of definition and persistence.
Prerequisites
Before diving in, gather the following tools and knowledge:
- Brass key blanks – at least two, one for primary impressioning and one for backup.
- Fine jeweler's files – for removing small amounts of material precisely.
- Lock lubricant (optional) – to ease rotation during testing.
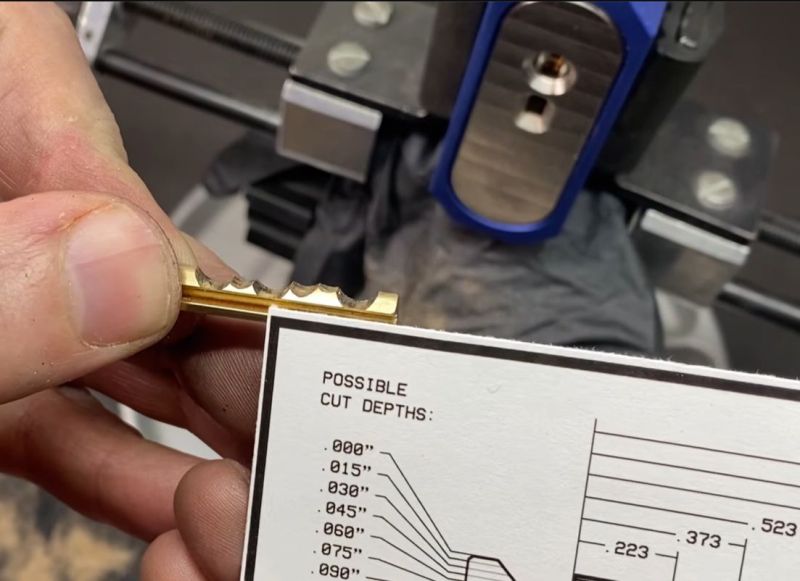
- Knowledge of bitting depths – required to interpret impressions correctly.
- Patience – this is not a quick process; expect 1–2 hours of repetitive work.
- Understanding of the lock mechanism – review the original video by Works by Design (see Step 1).
Step-by-Step Instructions
Step 1: Understand the Traveling Key Lock Mechanism
The traveling key lock departs from traditional pin-tumbler designs. Instead of a static key that lifts pins, the physical key moves inside the lock as you rotate it. This makes bumping or raking nearly impossible. Our target attack is impressioning: using the lock's own pins to mark a blank key, then filing away the marks to create a working key.
Watch the Works by Design video which details the lock's internals and the plastic pin added to thwart impressioning. Lock Noob provides a succinct summary before attempting the pick.
Step 2: Prepare the Impressioning Blank
Insert a blank brass key into the lock. Do not apply any turning force yet; simply ensure it reaches the full depth. The blank should be clean and free of burrs.
If the lock has a plastic pin (as this one does), be aware that it will not leave a clear mark — but we'll handle that later.
Step 3: Perform the Rotation and Filing Cycle
This is the core process:
- Insert the blank and gently apply rotational torque (clockwise or counterclockwise, but be consistent). Do not force it; use just enough pressure to feel resistance.
- Remove the blank and inspect for tiny indentations or shiny spots. These indicate where the pins have compressed the brass — areas that need filing.
- File away the marks using a fine file. Remove only the material that shows an impression. Avoid over-filing; gradual is key.
- Reinsert and test. If the lock still doesn't turn, repeat the torque-and-file cycle. Expect many iterations (the original attack took over an hour of this ad nauseam pattern).
Tip: Use a magnifying glass or loupe to see subtle marks. The plastic pin may tear instead of marking, but don't worry — its fragility works in your favor (see next step).
Step 4: Overcome the Plastic Pin
The plastic pin was designed to deform under impressioning pressure, avoiding clear marks. However, during repeated torque cycles, the pin actually tears at its top — as seen in the lock teardown. This tearing weakens the pin, effectively neutralizing its anti-impressioning feature. Once the pin is compromised, the remaining metal pins will leave normal impressions.
If you encounter a fresh lock with an intact plastic pin, the filing process will gradually break it. Replace any torn plastic pin with a fresh one if you plan to reuse the lock, but for a one-time defeat, continue filing.
Step 5: Alternative Foil-Based Impressioning
As a faster alternative, you can try a foil impressioning attack:
- Wrap a skeleton key (or a blank that fits loosely) in thin aluminum foil.
- Insert and rotate. The foil should create an instant imprint of the required key shape.
- However, in this lock, the pins enter sideways rather than vertically, so foil may not produce useful marks. To improve results, leave one solid side on the blank to catch the pin impressions — refine this approach through testing.
In the original attempt, foil failed because the pin orientation doesn't press straight down. But with a modified blank (adding a side wall), this method could work.
Common Mistakes
- Using too much torque – This bends the blank or damages the lock, marking irrelevant spots. Use a feather-light touch.
- Ignoring the plastic pin – Don't assume it will mark like metal; expect tearing, not imprinting.
- Over-filing – Remove only the impression marks. Removing too much metal ruins the blank.
- Skipping lubricant – A drop of lubricant can reduce friction and make impressions clearer.
- Not inspecting under good light – Use a bright lamp and magnification; subtle marks are easy to miss.
Summary
This guide demonstrates that defeating a so-called 'unpickable' traveling key lock is possible with patience and the right technique. The impressioning attack, though tedious (1+ hours of filing with knowledge of bitting depths), ultimately succeeded. The plastic pin deterrence was overcome by its own fragility. Whether you view a lock that takes an hour to pick as 'unpickable' depends on your standard — but as the LockPickingLawyer has shown, even sophisticated designs have vulnerabilities. For now, the 'unpickable' title remains a challenge, not an absolute.
Disclaimer: This information is for educational purposes only. Always ensure you have permission before attempting to bypass any lock.